Search This Blog

Monday, November 16

Golden Fireplace Update

Pinterest
Oh no! It's Monday... But that's ok I have an easy quick diy project that will totally take your mind off of it! Btw the title really should read Golden Fireplace Update Update.  Lol. Why? Well because I updated it once before when I originally added the rocks.  
You can see the original post here with all the instructions on how to add rocks to your fireplace.  Both updates were pretty simple and yet inexpensive too.

Ok so here's the deal.  I actually gave the entire living room a makeover and wasn't feeling the natural color of the fireplace anymore.  
This update I added color.  And all I did was spray the rocks using Rustoluem gold spray.  As well as, paint the trim white.
I needed something Fan-Tab-U-Lus!! 
 Yummy isn't it? I'm in Love!
Have an Awesome day!

Wednesday, November 11

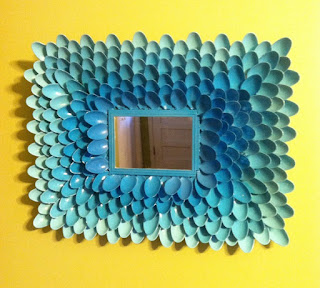
Spoon Mirror Tutorial

Pinterest
Good Morning Peeps!  Wanna make sure you're in the right place at the right time. Right?  I'm here right now but who know where I will be later... So make sure you're following me there too!
Twitter     @: SublimeDH
Instagram @: SublimeHome
Website   @: AprilDenise.Com


Welp it's Hump-Day again. And we are getting closer and closer to the holidays. So if you've been keeping up with me over the past few posts I've talked about my charity Poupadupa's House. You can read more about here.

However, on Instagram about a week ago I posted this picture of a spoon mirror I created for a kitchen nook. I received an overwhelming response and people wanted a tutorial. So you're getting the deets today!


As you know I'll be creating some amazing home makeovers this Christmas for families in need pro bono. And the spoon mirror will be one of them. It's really easy and cost under $10 bucks to make! Cool right.

Here's what you'll need:
  1. Spoons – I used 4 bags Purchased from the Dollar Tree
  2. Hot Glue Gun and sticks
  3. Spray Paint
  4. Cardboard or foam core – Used as backing for the spoons
  5. Styrofoam – Purchased from the Dollar Tree
  6. Round Mirror- Purchased from the Dollar Tree

Step 1. Break the tips off spoons (see left pic).


Step 2. Cut your foam core board to the size you want your mirror to be and trace out the mirror in the center of the board.


The size of the board can be any shape.  I used a square about 22" on all for sides.  However, I made this before and just cut out a round circle.


Step 3. Hot glue the round styrofoam to the center in the back of the foam core board.  Later you will use this to hang your mirror to the wall.


FYI:  This project is so easy to do while you're watching tv or sipping on a glass of red.  As you can see I'm doing Lol.


Step 4. Glue round tips of spoon around the outline of the mirror you traced.  Repeat until done by gluing spoons in a circular motion around each row.

This is what the complete mirror will look like after you have glued all of the spoon tips to the board.


Tip:  Remove all of the dried glue strings and then you're ready for the next step.

Step 5. Spray Paint & Enjoy
Tip: To hang simply place a small nail in the wall and push your spoon mirror directly onto the nail.
Easy breezy right?  I'd love to hear your thoughts!  Want more check out a previous post using the same styrofoam to create a s$2.50 Starburst mirror here.

The possiblities are endless check out these mirrors as well.

Image:Tutorial Click Here


Monday, November 9

Hollywood Regency Inspired Sliding Doors

Hey yall! Hope you guys had a Wonder-Full weekend. For the past few post I've been getting you up to speed on what I was doing over the summer
As well as, the Free Makeover service I'm doing with Poupadupa's House.  You can read more about it here. Now today I want to talk to you about an update that I did in my home over the last couple of weeks.
First off I want to start with some hideous sliding doors that I repainted. Yea you guessed it they were Ug Ga Lee! I really didn't like the original stain/color because it was just to dark.

And for me it just made me more sad every time my eyes glanced at them. Now don't get me wrong I love the functionality of the doors. But that color... Geez
You know what I did right? Right! Primed and painted them a nice glossy white. Ok so these doors can be seen while you're in my living room and they lead to the master. Well I took my handmade Mr and Mrs stencil and added that touch.
I love the outcome but I still felt like I was missing something. Now I've seen designs in the Hollywood Regency style and I really loved them. So.....
I ran to the nearest store and purchased this gold adhesive tape.  It only cost $2.99 from Staples and made by Sctoch.  I think it's my new best friend too. 
This tape is very shiny with a mirror like finish not only that it's very forgiving too. As I chatted on the phone with my baby sister, this is the design I free-formed around the Mr and Mrs.
What do you think I'm so in love!
Want more don't forget to follow here as well:
Twitter     @: SublimeDH
Instagram @: SublimeHome
Website   @: AprilDenise.Com
Shop        @:  Etsy.Com/shop/SublimeDesignHome

Friday, November 6

Giving Back: Poupadupa's House

Pinterest

Ok y'all I know I've been giving some really juicy updates over the last few posts. But as you know it's Fall and I need to pause for this incredible cause. If you are not aware I've create a charity called Poupadupa's House. (See my contribution page for more detailed info or click here or here.) 

I've been working on it over the past few years. I am an Interior Designer with a passion to give to the less fortunate. I am giving my time, skills, resources to create spaces for families in need. I decide to honor my daughters legacy by naming it after her. I lost my daughter Layla in 2001 at the age of 15 months. I love her dearly and can't think of anything else that I could better do with my gift than to help others. If you haven't read my story you can read it here.

So with that being said I need your help with any donation you can afford to give! This December Poupadupa's House will be giving several families a makeover.


A $10 donation goes a little further and we can create an inviting kitchen corner.

Why you ask? It's simple: The mission is committed to serving low income families where life has hit them hard. These families have been through a life altering event such as being misplaced, divorce, death and or job loss. PH with your help will offer these families a fresh start allowing them to regain their peace, security, pride and achievement.

Your donations count! With us working together we can create a space to make a family in need life a little sweeter. Donate $5 and help accessorize a work space with several of these items.


How can you give:
  1. Can mail or ship new gift cards or even used ones with a remaining balance.
  2. Can mail or ship household goods such as silverware, towels, accessories etc.
  3. Donate gently used household goods. (See List of items needed below)
  4. Paint/Rollers/Brushes Lighting/Bulbs/Lamps Plates/Silverware
  5. Area Rugs Artwork Spray Paint
  6. Curtains & Rods End Tables/Dining Table Coffee Table
  7. Picture Frames Sheets (New) Solid Comforters (New)
  8. Towels & Racks Nails
I thank you in advance for your support! May God keep you and continue you to Bless You!

Twitter     @: SublimeDH
Instagram @: SublimeHome
Website   @: AprilDenise.Com
Shop        @:  Etsy.Com/shop/SublimeDesignHome

Wednesday, November 4

Strawberry Sundae: Client Reveal

Pinterest
Hey it's Wednesday or Hump Day! And I have some juiciness for you today. Client Reveal Day! Woot.  But first a little Fyi:  I title the rooms I design with the names of drinks or dessert.  It's so much fun coming up with fun names like Strawberry Sundae... Mmmm.  Ok so I really enjoyed designing this space for my client Tammy. She wanted her color scheme to be black, white with a pop of red. So I delivered......

First off the stripes on the wall I did myself using Scotch Blue painters tape. To create the detail on the headboard wall I simply taped it off like this...

Then I painted the entire wall black. Once the paint dried I went back the next day to remove the painters tape. Well it went a little like this.
Now if you read my last post I showed you how I diy'ed those nesting tables on the right. If you missed it click here.


Oh and before I let you OOOh a little more. I also custom made the headboard. Again I choose to use a crocodile fabric just as I did with the nesting tables.


I love glam don't you? Well until next time loves, have an amazing week!

Where Am I?  Hey I'm here right now... But I promise who knows where I'll be later.. So make sure you're following me there too..

Twitter     @: SublimeDH
Instagram @: SublimeHome
Website   @: AprilDenise.Com
Shop        @:  Etsy.Com/shop/SublimeDesignHome

Monday, November 2

A Long Summer: Diy Dressers

Where Am I?  Hey I'm here right now... But I promise who knows where I'll be later.. So make sure you're following me there too..

Twitter     @: SublimeDH
Instagram @: SublimeHome
Website   @: AprilDenise.Com
Shop        @:  Etsy.Com/shop/SublimeDesignHome


A Long Summer: Diy Dressers

So I know I promised you more blogs. But hey life happens. Sorry about the disconnect. But if you are following me on Instagram as Sublime Home or Facebook as Sublime Design Home then you're already in the know of why I have been absent. And what I have been doing in the meantime. So first off I didn't forget about you. I love yall! But clients called and of course I went a running. Now that's out of the way. Lets get down to it.

Yes Fall is officially here, but during the summer I was working hard! Really Hard! On what? Right. Well unfortunately, I can't tell you all in one post. However, I will begin on this one. So come back because I will be posting Diy projects and client reveals over the next serveral weeks to get you up to speed. As well as, keeping you informed on what I'm doing now.

Ok what's first. Mmmmm Mmmmmm let's see (as I rub my hands together to determine which is the best story to pick up from). OH I know. Diy Dressers. Over the summer outside of working on clients spaces I transformed a several pieces of furniture. Now if you're new here I have tons of Diy projects and my routine to get them from drab to fab is usually the same. Since I've be gone for some time I'll just jump right in.


OOOOOhhHHH take a look at this monstrosity. Right. Well I picked it up from an apartment complex for free. The original occupants of the home left it behind. Now it was heavy. Yep Super solid. But we got it. Brought it home. Cleaned it up, lightly sanded it and went to town with my handy spray gun.


The knobs were not actual brass so polishing them really didn't work. No worries! I pulled out a can of my favorite spray paint and went to town. (Rustoluem of course.)


And this is how it turned out! Bee U T Ful... Right.. I know.


To let you in on a secret because I know you're wondering how did I know that ugly thang would turn out Gorg. Well I've come to learn that pieces with ornate detail shines brightly when color is added to it such as a white, pink, black or grey. Even if I would have chosen green or orange this bad boy still would have shined brighter than any star.


So the next time you're out looking for the special piece keep in mind the mostly ugliest will be the baddest in the end! Yep!
Ok so know that we've gotten that out the way. Take a look at this piece. I found these at the Goodwill Outlet store here in town. A set of nesting tables that had been painted way too many times. Yea they were Ug Ga Lee! Lol. But you already know that wasn't an issue that a little sanding and spray paint couldn't fix. $15 bucks for 3 tables was a no brain-er.

I did what I had to and this was the final result. I used of them in a guest room. After I added some faux crocodile fabric with some nail heads. You do know that they're really thumb tacks tho. Yea when push comes to shove. I'm just saying.


Isn't the fabric amazing. While here's another tip. I only paid a $1 for it. How? Well because it was a sample piece that my local fabric was getting rid of and boy did they have tons of it!


Here are the tables in the space. Just lovely huh. Well thanks. At this point I'm guessing you want to know more about that room. Well come back for the next post and I will show you my clients reaction as I reveal the room to her. Until then my friends. Toodles!


Sunday, May 24

Pink Glam Client Reveal Part 2

Pinterest
Previously, I showed you a space that I designed for a client.  Well here is part 2 of that makeover.  If you didn't see part one click here.  I had so much fun designing this space.  And the client is still raving about it two months later! Yay!
THE LIVINGROOM
Before
Drapes custom made, Sofa client owned, acrylic nesting tables; Craigslist find.

Place a fur rug directly over a stool and Instant Glam!
Drinks anyone?  Their on the House.... 
 
Come on lets Wine a Bit I'll make you feel Better!


So What Did the Client Say Exactly?

Where Am I?  Hey I'm here right now... But I promise who knows where I'll be later.. So make sure you're following me there too..

Twitter     @: SublimeDH
Instagram @: SublimeHome
Website   @: AprilDenise.Com
Shop       @: SublimeHome.Weebly.Com
Or          @:  Etsy.Com/shop/SublimeDesignHome


LinkWithin

Related Posts Plugin for WordPress, Blogger...
The way to get good is to get interested. The way to get great is to get downright fascinated and passionate. Imagine being completely intrigued, and so passionate about something that you simply can't get too much of it. When you can do that in some particular field of expertise or endeavor, you can accomplish anything you choose to accomplish in that area." Ralph Marston